In today’s digital world, how to custom print size dnp-ds820 is becoming more and more popular. Many people are looking for ways to print unique items for personal or business purposes. The DNP-DS820 is a powerful dye-sublimation printer that offers high-quality custom printing in various sizes. In this article, we will explore how to break the mould and custom print size DNP-DS820.
What is DNP-DS820?
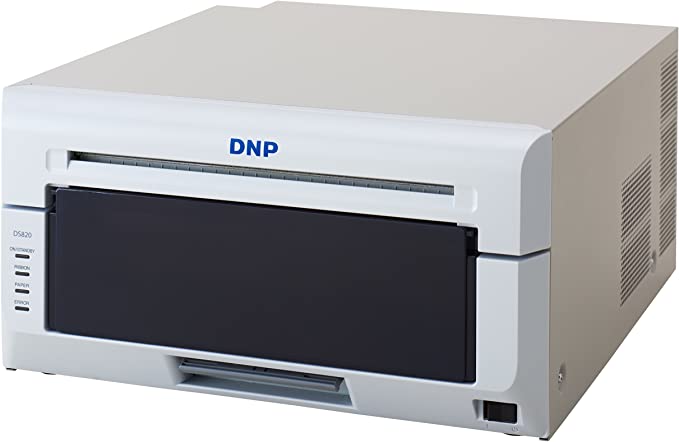
The DNP-DS820 is a dye-sublimation printer that produces high-quality prints.how to custom print size dnp-ds820 It uses a heat transfer process to transfer dye onto the paper, creating vibrant and long-lasting prints. The printer is compact and lightweight, making it easy to transport and set up.
Why Custom Print with DNP-DS820?
Custom printing with DNP-DS820 offers many benefits. First, it allows you to print in various sizes, including large-format prints up to 8×12 inches. Second, it offers excellent print quality with accurate colour reproduction and sharp detail. Third, it is a cost-effective way to produce small print runs with quick turnaround times.
How to Custom Print with DNP-DS820?
How To custom print Size DNP-DS820, you need to follow these steps:
Step 1: Choose Your Image
The first step is to choose your image. You can use any image you want, but it should be high-resolution to ensure the best print quality. You can use an image from your camera, smartphone, or computer.
Step 2: Prepare Your Image
Once you have chosen your image, you need to prepare it for printing. This involves adjusting the image’s size, colour, and brightness. You can use image editing software like Photoshop to make these adjustments.
Step 3: Set Up Your Printer
Next, you need to set up your DNP-DS820 printer. This involves installing the printer drivers on your computer and connecting the printer to your computer using a USB cable.
Step 4: Load Your Paper
Once your printer is set up, you need to load your paper. The DNP-DS820 uses roll paper, which is easy to load. Open the paper tray, insert the roll paper, and close the tray.
Step 5: Print Your Image
Finally, you can print your image. Use the printer software to select your image and adjust the print settings like size and orientation. Then, click the print button, and your image will be printed.
FAQs:
Q1. Can I print on different paper types with DNP-DS820?
A: Yes, you can print on various paper types, including glossy, matte, and luster.
Q2. Can I print borderless images with DNP-DS820?
A: Yes, you can print borderless images up to 8×12 inches.
Q3. Can I print from my smartphone or tablet with DNP-DS820?
A: Yes, you can print wirelessly from your smartphone or tablet using the DNP mobile app.
Q4. How long does it take to print an image with DNP-DS820?
A: The printing time depends on the image size and quality. However, the DNP-DS820 is known for its quick printing times.
Q5. How much does DNP-DS820 cost?
A: The cost of DNP-DS820 varies depending on the retailer and location. However, it is a cost-effective option for small print runs.
Conclusion:
How to custom print size dnp-ds820 dye-sublimation printers is a powerful tool for custom printing. It offers high-quality prints in various sizes and is easy to use. By following the simple steps outlined in this article, you can create unique and vibrant prints that stand out. The DNP-DS820 is a cost-effective option for small print runs with quick turnaround times.
With its ability to print on various paper types, including glossy, matte, and lustre, and the option to print wirelessly from your smartphone or tablet using the DNP mobile app, this printer is a versatile choice for both personal and business use. With the DNP-DS820, you can break the mould and unleash your creativity to produce prints that leave a lasting impression.